
Video Overview | Timemore E&B Burrs
The E&B burrs come standard on the Timemore Plus series grinders (except for the G1) and are compatible with the Chestnut series grinders (C2, Slim, NANO).
Transcript
Hey. I'm Steve with Prima Coffee, and today, we're going to take a look at the new E&B, or espresso and brewing, burrs from Timemore. So on previous Timemore grinder models, they had a stainless steel burr that you could get for brewing or a titanium-coated stainless steel burr that you could get if you wanted to do espresso. And so, in the meantime, what they were doing was sort of designing a burr that could do both of those things. These can feed really efficiently down in the fine range which was the problem with the stainless steel burrs before was that even though you could sort of theoretically grind for espresso, it didn't feed very well. These burrs here have these little teeth on the top, on the breakers here, and we think that that's what causes them to grab and to feed so efficiently.
So we wanted to go ahead and show you how to install these burrs in the Timemore Chestnut C2. If you ordered one of these before, it would have come with the stainless steel burrs inside of it which are for brewing. If you've decided that you'd rather have burrs that do both brewing and espresso, you can buy these E&B burrs and install them into that C2. So the first step in installing these burrs is taking out the stainless steel burrs that are in here. And it's pretty simple. The center burr is taken out by just turning the dial counter-clockwise until the center burr comes loose. There we go. And there is that center burr right there. And you'll notice that these burrs are very similar, but the E&B burr has those little teeth right there so you can distinguish, and the old burrs also have some writing on the bottom. So that'll help you to distinguish between those. And to get the outer burr out, you just need a Phillips head screw driver, something very small because these are small screws and there are four of them on the perimeter there. So there you go. That is your outer burr right there, and again, there's some writing on there to help you distinguish between the two. So what you do to get this one in is I would clear away any coffee that you have there, the teeth facing up. There is a notch here that has to correspond going in there. That's in. And then, go ahead and get this into place, and just go ahead and do the exact same thing.
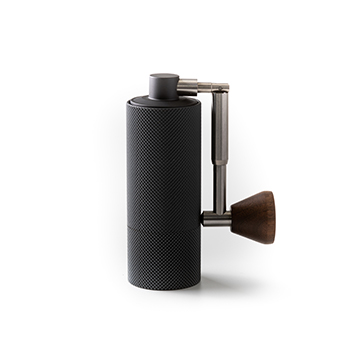
And so, what you do is you take it all the way down to 0, so turn it clockwise all the way down to its stopping point and that's when the burrs are touching. And then, from there, you can back it off to find your preferred grind setting. We are recommending that you go to 8 as a starting point for espresso, and then 15 as a starting point for, you know, getting into pour overs and things like that. So let's take it to 8 here. And then, I want to show you the sort of how long it takes to grind. So this is, again, 18 grams of coffee here, and with the E&B burrs, it's really efficient. So it's only taking about 45 seconds to grind 18 grams at the 8 setting for espresso and just to kind of give you an idea of what that looks like. So the Nano Plus just like the Slim Plus has this knurling design here on the outside of the body which makes it really easy to grip. It's sort of much like a barbell if you've ever done that. Alright. So that's, yeah, about 45 seconds there to grind. Let me just kind of show you what we have. You can see there that the grinds catch is full, so you can't really do much more than 18 grams, it's what fits into the hopper and that's really what fits in here to the grinds catch. You can see there that that is your espresso grind. The Nano is going to be really great, well, for travel because it's only about 5 inches tall here and less than 2 inches in diameter, but also great for your single servings or your V60 01 or your Kalita Wave 155 and your espresso, again, up to 18 grams.
So we recommend that you keep it a little loose here. You're going to use this center burr to center that outer burr. So you're going to put this in and you're basically going to tighten this all the way in until it pushes that outer burr into its place. So you would put the cap on there, push this in, this piece, that knob fits into this notch here. Then go ahead and put the dial on, and you can screw it in all the way. Once you've reached your zero point there, the crank arm's not moving, then you can go ahead and tighten that outer burr into its place. So once you've done that, you are now ready to start grinding for both espresso and for all brew coffee methods. You can find those burrs online at prima-coffee.com. Thanks for watching.


