
Video Overview | Victoria Arduino Eagle One Prima
The Eagle One Prima is Victoria Arduino's robust yet efficient one-group espresso machine for home or small commercial settings. Among its many features are two small boilers—a 1.5L boiler for steam and a 140ml boiler for brewing. Despite their size, the Eagle One Prima steams milk incredibly well and speedily; and the brew boiler heats just enough water for a shot or two, saving energy and time. In addition, the machine has an app in which most of the functions can be adjusted and seen, including temperatures, volumetrics, and neat features like automatic grouphead flushing. In this video, Steve begins with a quick demonstration, making espresso and steaming milk, and then proceeds to walk through its many capabilities.
Transcript
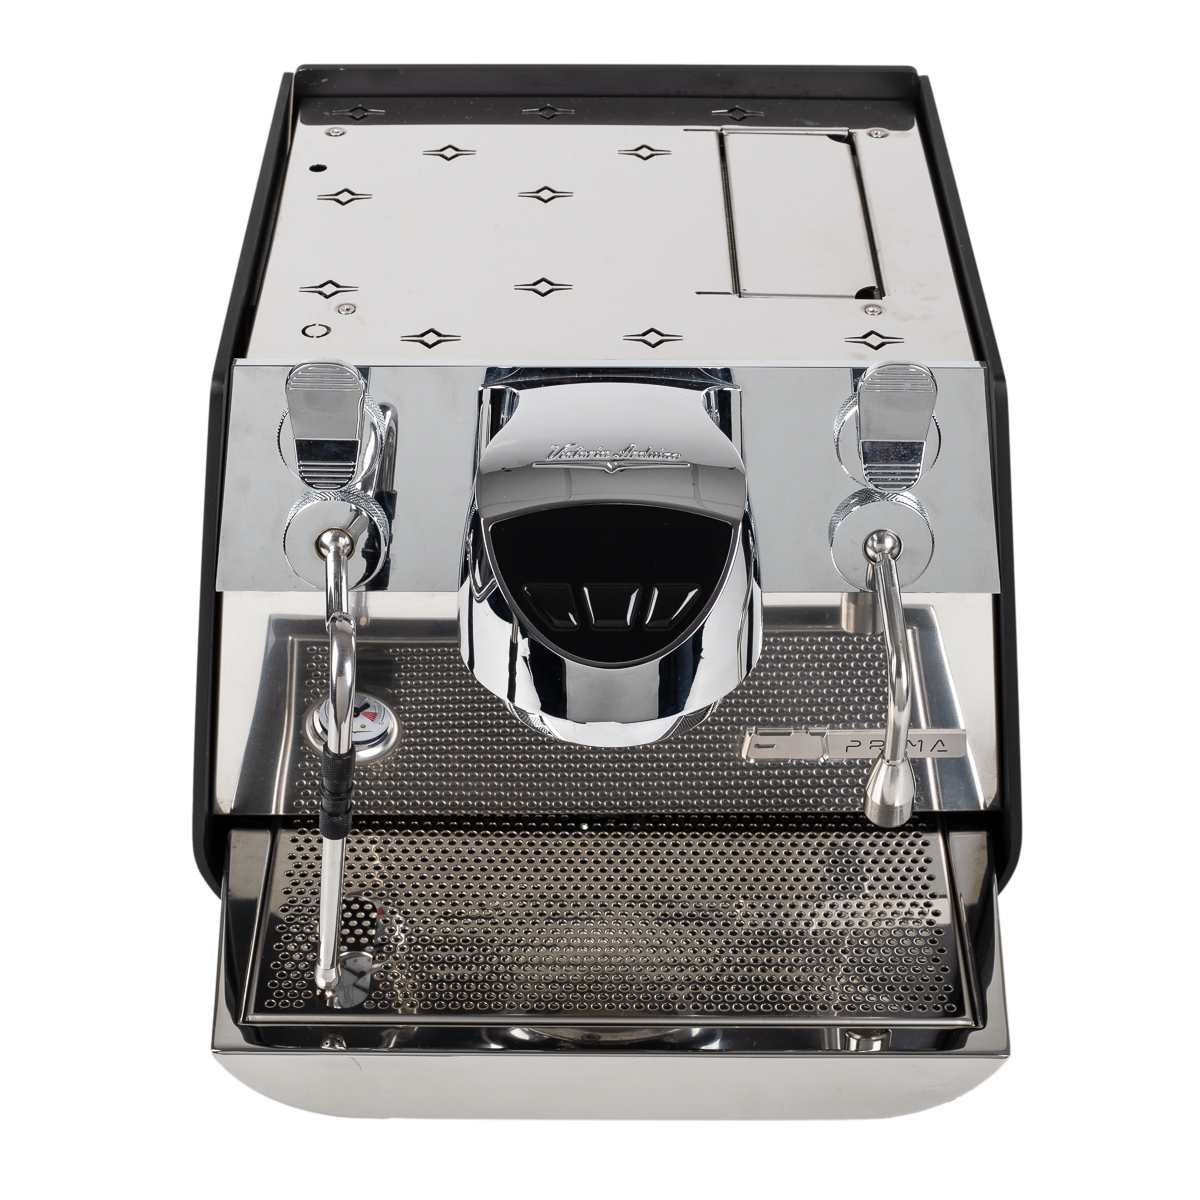
Hey, I'm Steve from Prima Coffee. And today, we're going to take a look at the Victoria Arduino Eagle One Prima. The Eagle One Prima is a prosumer espresso machine that bridges the gap between the commercial machines and the home machines. So if you want to use this at home, this will totally work. It has a reservoir in here, it's a 1.4-liter reservoir. The cable is just a 110-volt cable, so it will work for any home outlet, but at the same time, this will work for commercial applications. It is a volumetric machine so that will save you some time so you don't have to be watching the shot. It has a really powerful dry steam and fast recovery time. This machine will come in black, the one we have here, silver or in white. So let's take a look at the outside of the machine here. This is, as you can see, it's a one-group espresso machine. It has a ghost display here, which is to say that you'll see nothing on this display here except for this little heating icon that shows you the PID is working. So it's constantly trying to keep that temperature stable. And you have your three buttons here that are just lit up in the back. The one on the left here is going to be one of the volumetric buttons so you can program this for volume. You can program the one on the right for volume as well, and then the one in the middle here is just your continuous run. You can see when you're running a shot, the shot timer will come up there, and then when you turn it off, you can set the number of seconds that that time stays on the machine for you. One of the cool features is it has an automatic flush function. So after your shot, when you pull the portafilter out, the machine will go ahead and flush that screen for you, which saves you a little bit of time from hitting the button yourself. And it's just one of those smart little features that makes this more efficient. You can also set that time. So you can set the amount of time that the machine will wait after you've removed the portafilter to flush and you can set the number of seconds of the flush itself. And that's all done in the app, which I will show you here in a minute. So it will only do it after you've run the shot so you can see it's not going to do that there.
This is a cool touch steam one. Like we said, it is really powerful. It has four holes there in the tip but it still... it steams milk really, really quickly. The steam boiler has a gauge right here. As you can see, it's set to about two and a half, which is really high. That is one of the reasons that makes this steam so dry and powerful. The actuator up here, you can have a flush, which is just pushing it in. Right, a purge. So hitting that top one, and just hold it for as long as you want and it'll purge, and if you hit the bottom one, as you can see there, it'll run continuous. Now, it's a top and a bottom, but really, I mean, you can think about it as a push and a pull. When you push it, it purges, and when you pull that, it's a continuous run. So the same actuator over here on this side but this one's for the hot water. And there is a cool mixing valve here on the hot water so it is never going to start coming out, it's just steam. You're going to be able to use that for teas, for americanos, and things like that. This one over here isn't set for a purge on the top and a continuous run on the bottom. What you have here is you can set the top button to run for a number of seconds. You can set the bottom one to run for a different number of seconds if you want as well. From the outside, we also have the drip tray. You can just pull it right on out. It's pretty shallow and it stays in there quite well because it has this silicone band across the top that will stick in there but you're going to have to empty this quite a bit because it is pretty shallow as you can see right there. One thing about this drip tray is that even though you can plumb this machine in, right now, we have it set on the tank mode and the tank is right here in the center. This is a 1.4-liter tank. You can pull this out to fill it, kind of see it there. There's your max fill. It's not a very large tank but it is definitely enough for your making espresso at home. And if you're going to have any commercial applications, you're probably going to want to plumb this in. Even if you plumb this in, Victoria Arduino are not actually punching holes in the bottom of the drip tray so you can't actually hook this up to your drain. You're still going to have to empty this, for now, or you can cut a hole in it. You can drill a hole there so that it does drain out the back and you can have your hose. And directions for how to do that are going to come in the box. From the inside, we have a pretty small boiler. It's only 140 milliliters and being that small makes it efficient. It's only heating the water that you're going to need for your espresso shot and the pathway from that boiler to the group head is heated as well. This is a heated group head. The steam boiler is 1.5 liters so still kind of small for this category of espresso machines, but like I said, this is really powerful and dry steam. It also has an internal rotary pump built-in through the back here and that pump can be adjusted. So right under the back here, by this back left leg, there is going to be a dial that has the texture and looks a lot like one of these legs but it's a little bit smaller. And with that, you can adjust the pressure of that pump and so basically the pressure that you're brewing with. And the easiest way to do that is to go ahead and put in a blank basket here and run this machine and use the app because you can't see what the pressure is. There's a manometer down here that shows you what the pressure is but you don't have anything showing you the pressure for your brew boiler here on the face, there's no dial to show you that. The only way to see that is in the app, and if you want to adjust that brew pressure, you're going to have to be looking at the app where it gives you that live reading of brew pressure and turning that up or down while you're running it with a blank basket.
And as you might have read, this is a 100% digital machine, that is the way that Victoria Arduino is talking about this. One of the things that means is that it is controlled almost entirely in the Victoria Arduino app and we'll show you that here in a second. And also, that this here can be updated. So the software that runs this machine basically and that allows you to do so much work here in the app can be updated. There is a USB port inside the machine to do that. It's also Wi-Fi enabled. Right now, they do not have the capabilities to update your software with Wi-Fi but that may happen in the future but you can update the software through that USB port in there. The app is the main way that you're probably going to control this machine. So there are a couple of things you can do here on the menu without using the app. Like I said, you can change the brew pressure but you're going to need the app to see what that pressure is so that you know what you're changing it to. But with the machine here, on the menu, there are a couple of things that you can do. One, you can do the...setting the temperature. To get into the menu, you're going to hold the two outside buttons until the middle button starts to blink, and then when you get that, you'll see the temperature come up. And at this point, you can set the temperature. So if you hit the one on the right, temperature will go up, hit the one on the left, temperature will go down, get it to where you want and then hit that middle button. And it'll take you to the next part of the menu. This is your doses. So you can set your volumetrics for your first button volumetric and your last button volumetric. The middle one is always going to be your continuous run but if you hit that, it'll start the timer. Of course, you'll have coffee in there and you'll have a scale and you'll be setting your volumetrics. When it gets to where you want, hit the button again and now that is set. You can do the same thing on the outside. So the last one here is cleaning, that's cL for cleaning, lights up that last button. When you hit that, the cleaning cycle will begin. You want to have your espresso cleaning powder in there, your blank basket. When you're done with the first round of it, you'll take out the portafilter, you'll dump it, you'll put it back in, hit that last button again which will be lit up and it'll run the second cycle of cleaning so that you can automatically backflush this at the end of every night if you're using this in commercial settings or, you know, every couple of days if it's at home.
So now we're back out here on the main menu and as you can see, the only thing that's going to be showing are these lights here behind those buttons and then when the PID is working, you'll see that little heating element there. So on the outside of the machine, what we have here is a ghost display. So basically, this is set up to not have anything here on the screen unless it's information that it needs to share, such as when it's running, what's the time, or when you're setting the parameters, it will show you the heat and things like that. When the machine is starting up, it will also show you the degrees here in Celsius. So it will show you the temperature as it's heating up, and then once it reaches temperature, that screen will go ahead and disappear. Now, let's jump into that app. So it's a Bluetooth app. So you'll need to download that Victoria Arduino app, you'll need to connect it to your machine, and then once you've done that, you're going to get this menu here. Once you're in the menu, you can have your display, which just basically shows you what the display, if you had one here on the machine, would look like. So it's got your temperature reading, it's got your time reading, so the most previous shot you had, the real-time pump pressure, and then the steam pressure as well. So the steam boiler pressure is set to 2.5 or 2.4 Bar and it's up to 2.5 Bar right now. So it's giving me a real-time reading of that. In your keys and in your display, you can set the LED bar on or off. So when you hit save, you'll see it talking to the machine and it... lights are off. You can turn that back on, hit save, now the light is back on. You can also set the duration in seconds here that the time stays on the screen after your shot. So you set it down to four, hit save, speaking to the machine... So that means that when you run a shot here, we'll wait for that time to go off. When you run a shot here, that number one there will stay on for four seconds, and then it'll go away. And you can set that here. Back out to the main screen, you have your water doses, which allows you to set the doses here for the top lever and the bottom lever on the hot water, that's what the Time key 1 and Time key 2 is.
You can also set the volumetrics this way. The best way we found is to basically set it with your machine. So, you know, prep your puck, put it in there, do your volumetrics on the machine, and then you can see it in here and you can adjust it up a little, back or down, and then hit save. It also has your pre-infusion, which they're calling Prewetting, you can turn it on or off, and then you can set the pre-infusion time. So how many seconds it runs is the Prewetting on time, and then how many seconds it waits to turn on the pump for the full shot. So 5 seconds on, 5 seconds off. And then, the duration down here is how many times do you want that cycle to repeat. So since we have it at 10 seconds and these add up to 10, the cycle won't repeat. The pre-infusion is 5 on, 5 off and then the shot will run. If I put that on 20, for instance, and saved it, then they would go on-off, on-off, so it would run it twice. So that's how you do that. You have your temperatures. You can set the temperature for the brew boiler in here and you can set the steam pressure in here. See we have it, it's 200.3 right there. Your counter show you how many shots that you've done and it'll also show you how many comes out of each different button. It'll show your steam and your hot water as well. Machine clean is your purge. So when you remove the portafilter after running a shot, it'll automatically flush. And in here, you can set those parameters. So you can set how long the flush is for, they're calling the flush the purge, and how long of a delay after you've removed the portafilter do you want it to wait before it starts to flush, you can set that there. And then, you can go into your technical settings and you can set your offsets for temperature and things like that. If you wanted to set it to Fahrenheit, so when you're looking at your display you're reading the temperature here in Fahrenheit, that stuff is in too because on the machine, it'll always be Celsius. But you go into your settings, settings is down there, and you can see down here, it says, what temperature do you want? You can go in here and say, "I want it on Celsius or I want it on Fahrenheit," and then you can go back out and it'll save it for you. So your display now will read in Celsius. So that's it. I mean, that's what you're able to do in the menu. And then, you can also make recipes if you want, save them in here, you can go into the cloud, find other people's recipes for different coffees that they're making on espresso, and you can download those and you can use those as well. Another note is that when you set the parameters on the machine, it's not automatically going to speak to the app in the way that when you set the parameters in the app, it automatically speaks to the machine. And you'll see, again, you'll see the temperature show up here when you hit save and it's saying that it's basically sending it to the machine, saving it in the machine. However, if I'm going to set the parameters here on my dose, dose one volumetrics on the machine, not in the app, it's not automatically going to send that to the app.
So when I'm reading it in the app, it's not going to show me what I just did, it's going to show me what it was when it was saved last in the app. So that's a little bit of a quirk and the way to see the true parameters is to go and close the app, reopen the app, and then you will see what that parameter is set to now. Also, we've noticed that the tank being set where it is, kind of right there around all of that heat, I'm sorry, not the tank, the reservoir, the reservoir gets pretty hot in there. It's a plastic reservoir and it gets to, we see, about 108 degrees Fahrenheit, which is well above room temperature of course. So that's a consideration as well. Also, you can get a bottomless portafilter that'll fit the Eagle One Prima. What we've noticed though, is that the automatic flush, so when you remove the portafilter after your shot, the automatic flush does not always activate when you're using the bottomless portafilter in the way that it will work with the portafilter that's made for the machine and we're thinking that's just because the portafilters are different heights here. This one goes a little bit higher and it touches that sensor that's behind the group head. So along with the machine, you're going to get a box of your accessories. It's going to include your tamper, a couple of baskets here, two portafilters, one that is a single spout, one that is a double spout, this microfiber cloth, this cleaning package here that's going to give you another cloth in there, a group head brush, and some cleaning powder. And it's also going to come here with this water line so that you can plumb it in. A note about this, this is really simple actually. You're just going to basically screw this into the back of the machine and then put that into your waterline. However, this is British here and so you're going to need to probably get a little adapter to put onto that so that you can hook it into your home or commercial water supply. So just do know that. So that is the Eagle One Prima from Victoria Arduino. It is a prosumer espresso machine, like I said, and it fits there right between the home and the commercial, you can use it for both.


