
How to Plumb in the La Marzoco Linea Mini
Now there's no need to wait months, or pay the extra cash for an OEM Linea Mini Plumb-In Kit! Consider the Prima Coffee Linea Mini Plumb-In Kit instead. This intuitive kit, including water-in and drain-out components, is simple and quick to install and won't leave you frustrated. If you have any questions about installing this kit, please reach out to sales@prima-coffee.com.
Hi, I'm John with Prima Coffee, and today we're going to talk about how to plumb in the Linea Mini with the Prima Coffee Linea Mini Plumb In Kit. Prima Coffee came up with a Linea Mini Plumb In Kit. Just a little background information on that. The OEM La Marzocco kit is a great kit, but became pretty difficult to obtain due to some specific proprietary parts that they had in the kit. So we thought it would be nice if we could come up with a fairly simple alternative to that kit, with parts that are more easily obtainable. Also, we wanted to find something that would be a little lower price point, and maybe even just a little simpler to install.
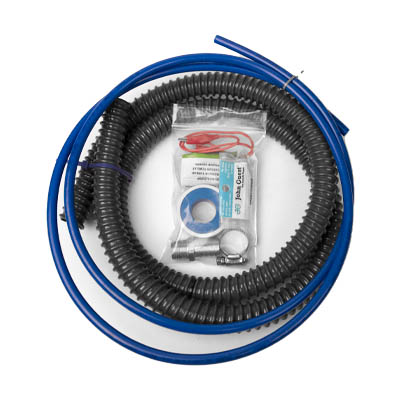
So let me introduce you to the parts in the kit. We have a three-eights-inch plastic water line and a three-quarter drain line. Approximately five feet of drain line and six feet of water line. The idea really is, you should be about within four feet of where your plumbing connection is for the water, and where your drain is for the drain line. In addition, we have this three-eights to one-quarter-inch push-lock connector. We have this three-eights to US three-eights compression female fitting union. We have a drain connector. This is a half-inch to three-quarter barb. We have some plumbing tape to put on the threaded part of the drain connection. We have a clamp, when you put your drain hose onto the barb fitting. And here we have an alligator clip. And we'll explain how this all installs.
Okay. So let's start the installation of the Linea Mini Plumb In Kit. The first thing we're going to do is, we're going to remove the top panel of the machine. You'll have this drop-in panel, which will come off. And then you'll unscrew the panel below.
All right. So we removed seven of the top panel screws. There will be an eighth screw that sits back here. It has a wider hole. This is actually holding the CPU on. Leave that screw where it is, so the CPU does not fall down into the machine. Once you get the screws out, you can lift off the top. Put that to the side.
Okay. Now the first thing we're going to do is, we're going to remove the existing waterline that connects the water reservoir to the inbound side of the machine's pump. We've got a 14 millimeter box wrench here. You can use an adjustable, I just find this a little bit easier to get into the machine. So what I'm going to do is, just simply loosen the copper fitting that accesses the transition from the T here to the vinyl tube that connects to the water reservoir. And then I want to take the vinyl tube off. So I'm going to use these needle-nose pliers, and I'm going to carefully slide it off, making sure that I keep my transition tube fitting handy.
And then I'm going to go to the water reservoir. And I'm going to either pull the reservoir out completely, if I'm done with the water reservoir, I'm going to keep it plumbed in. Now, if you want to keep the water reservoir option, you might consider keeping the vinyl tube in the machine. If you pull it out at this point, it'll be difficult to get back in, as we speak of the factory setting way that it's in. So that option's up to you, but for right now, I'm just going to pull the water reservoir tube off of the water tank. Just a barb fitting comes off, and then I'm going to set the water tank aside.
Now we need to install our new water line that's going to send water from our water supply into the machine. Now to do this, there is a cover panel that's covering an access hole that we're going to use to put the water line inside the machine. And I'm going to unscrew this. I have a long screw driver. You don't need one this long, but I find it's just a little bit easier. Okay. So we've unscrewed, and now I'm removing the access panel cover right there, and we'll put that to the side.
Okay. Now we're going to take our water line, and we're going to insert it into the hole that we've just opened up for the access panel, and I'm going to push the water line up. Once you push it enough, you can grab it and pull it through. Then what I'm going to do is, I'm going to take our three-eights to one-quarter-inch push-lock fitting, and I'm going to put it on the part of the water line that's inside the machine.
If you're not familiar with push-lock, basically what you're doing is you're pushing past a little snap ring and a gasket that's going to secure this water line. And the important part here is to make sure that it's fully pushed on. You'll feel a little snap when it's successfully connected, and sometimes it's subtle, but as long as you make sure it's pushed tight, you'll be good to go. Okay.
So we're going to go back, and we have our adapter fitting. And we're going to take the copper end of the pipe and insert it into the quarter-inch. And again, same thing, little snap. Good to go. Okay. Now we need to connect this fitting back to the T that acts as the inbound side of the water line for the pump. And I'm just going to get it in place. And then I'm going to tighten it by hand. And then I'm going to take my 14-millimeter box wrench and make sure it's secure. You don't have to over tighten here. Just got to get it snug enough.
So the other end of the line, we're going to connect our three-eights push-lock to three-eights, female compression, so that we can easily hook it to our existing waterline supply with a three-eights compression fitting. Again, push tight, and good to go. So we're going to place this off to the side right now and pull this out through here. And good to go.
Okay. So the next thing is, we need to set up the drain tray for the drain fitting and the drain tube. Now on your machine, you will have a plastic plug that fits in the back of this. All you need to do is, there'll be a slotted space on that plug, and you'll just take a flat head screw driver and remove the plug. Set it aside. Again, if you're going to go back to a non-plumbed-in system, make sure you keep that cap so that you can use the drain tray at a later time.
So what we have here is our drain tube connection piece. This is a half-inch mill pipe thread and a three-quarter barb. The threading on the Linea Mini drain tray is technically metric, but luckily for us, it's also plastic. Which means it's a bit moldable, even if our thread type isn't exactly metric. And what I want to do is, before I complete the installation of this piece, I just want to thread it in by hand, just carefully. And if it's a little tight, you can use an adjustable wrench. And the idea here is, we just want to make sure that the plastic threads on the inside of the tray are basically trained, so that they fit well with this fitting before we put some Teflon tape on it. Okay. So that's good, and I'm going to go ahead and unthread it.
And then we'll wrap our Teflon tape. So we're going to go around, and we're going to do about three wraps. Luckily this isn't a high pressure system. We just want to make sure that we don't have subtle leaks. So usually that's enough tape. If you put it together and you end up having some leaks, take the fitting out, reapply tape, put maybe four wraps, five wraps. So once we have it taped, then we're going to go ahead and thread it back into the drain tray. And again, hand tighten until it gets stiff, and then continue to tighten a little bit more with the wrench. You don't have to go really hard on this. The best thing to do is just be slow and careful.
Okay. So then we're going to take our clamp, and we're going to put the clamp over our drain tube, and then we're going to slide the drain tube onto the bar fitting. Okay. And then simply tighten the clamp until the drain tube is securely onto the bar fitting.
And then before we put the drain tray back in the machine, there's one last thing to do. And this is where our alligator clip comes in. We buy these in bulk, this one's yellow. If you get a different color, don't worry, it's all the same thing. It works the same. The idea is, we just need to tell the machine that there's no more reservoir tank inside of it. And in order to do this, we need to create continuity between the two tank leads that are on the bottom of the machine here. So what I'll do is, I'll take one side of the alligator clip, and I will clip it to one of the wire leads. I'll take the other side and clip it to the other wire lead. Okay. And then I'll just kind of push it back in, get it out of the way. It's fairly simple. If you don't think it's set up correct, you'll know when we turn on the machine, because you'll get a water tank error, because it won't be sensing continuity correctly down there.
We've gone ahead and moved the drain line to the underside and back of the machine. And then we're just going to pull it through a little bit more. And make sure our drain tank is in place. Okay. Once we've done that, now we're ready to connect it to water. Make sure we don't have any leaks, then power it on and test it to make sure everything's functioning properly.
Okay. So we've connected our water line to the supply. Before we turn the machine on, before we even plug it in again, we're going to double-check and make sure that nothing is leaking. So I'm going to check both sides of my push-lock fitting, and the nut at the end of the copper pipe, and all looks good. Okay.
So one thing also I like to look at before we start the machine up, is the brew pressure gauge down here is reflective of the incoming pressure from the line. So that's a good way to tell, initially, if everything is hooked up and connected well. Here we have about four and a half bar of pressure coming into the machine right now.
Okay. Now we're going to go ahead and power on the machine. Make sure that our continuity connection down here is good. Make sure the machine is running properly. Okay. We've plugged in the machine. I'm going to go ahead and powered it on, now that we've made sure everything is tight and not leaking, and that we have noticeable pressure at the brew gauge. Okay. And of course, if you're familiar with how the machine works, if your connection with the alligator clips down below is correct, you'll have a solid blue light next to the water icon, and your machine will start heating. You'll have the flashing red light here up at the power icon. And you'll also notice that your brew pressure gauge will go up, because the water in the tank is expanding, and you'll see it get a little higher, closer to 12.
So once we've verified all that's working okay, we'll go ahead and just check and make sure that we have water coming into the group. We don't hear the pump struggling. We have nine to 10 bars of pressure on the pressure gauge once the group and the pump are engaged. Go ahead and turn it off. And once we verified that everything is working appropriately, we're going to go ahead and put the top back on and then we're ready to use our plumbed-in Linea Mini espresso machine.


