
Video Overview | PuQ Press M3
Countless hours of strenuous tamping are a thing of the past with the Puqpress. The M3 model was designed specifically for the Mahlkonig E65S and the E65S GbW. Discovering and duplicating the perfect tamping style is nearly effortless thanks to its variety of pressure and tamp settings. Provide consistency to your café with the help of the Puqpress M3.
Transcript
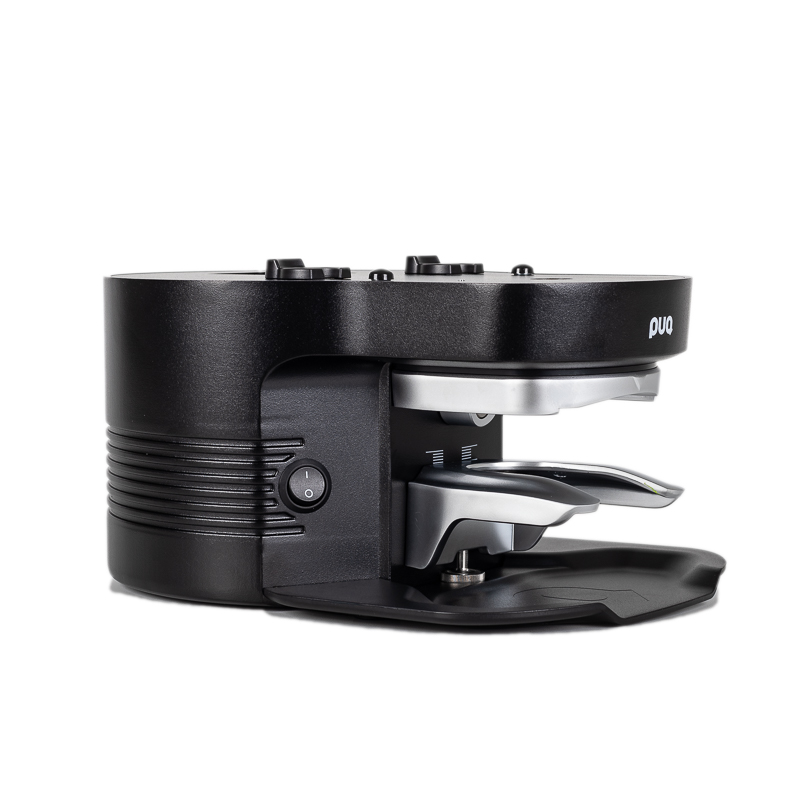
Hey guys, it's Ragan from Prima Coffee and today we're going to take a look at the PUQ Press M3. The M3 is a fully automatic tamper that was designed specifically to go with the Mahlkonig E65S and the E65S GBW, the Grind-by-Weight. This tamper thrives in high-volume cafe settings, and that is because it is a workhorse. Fresh out of the box, it comes with a two-year unlimited tamp warranty that shows that this thing was built to last and to work. It comes with a wide range of pressure settings and five different tamping settings. And this gives you the freedom to experiment, and play, and pinpoint exactly what works best in your cafe. Once that's dialed in, you get consistent tamps regardless of the barista and the skill set. And most importantly, restraint is a thing of the past. The M3 was designed to have a very small footprint. As you can see, the grinder itself sits on top of the tamper. This means that you save a lot of space by not having two machines sitting side by side. The M3 itself sits at 14.7-centimeters high, 28.3-centimeters deep, and 19.4-centimeters wide. We also offer it in a white and a black option just depending on what style you're looking for. It has a 58.3-millimeter piston that makes a really precise tamping and it's compatible with all portafilter types, bottomless, single spout, double spout, and it's compatible with the VST basket. This lower clamp right here is adjustable, so you can move it up and down to accommodate the height of any portafilter. Setting up the PUQ Press with the grinder is probably the hardest part but thankfully it is a one-time job. Once you have it there, you're probably not going to have to move it again. But it should be noted that it is a two-person job. First, to plug in the PUQ Press itself, you want to make sure that the cord is plugged into the back, kind of underneath in the bottom, and then it will go directly into the outlet. When it comes to perching the grinder on top, you'll need someone to hold the grinder take the cord, and string it through a hole that sits on top of the PUQ Press. You will move that down and there's little nooks at the very back that keep the cord secure. Hook it into that and then plug it into the outlet. On top, you will see little nooks as well that align with the legs of the grinder. These will scoot right into the legs. And then, it'll sit securely on top and it really won't go anywhere. And once that's done, you're done, and it's not something you have to worry about regularly.
Using the PUQ Press is very simple. To get it started, all you have to do is flip this on/off switch up to turn it on and you will see a light come on and numbers on the display screen. These numbers right here are the pressure used in the setting that it's in right now. I do believe it's in the first setting which gives you a range of 22 to 66 pounds of pressure. To adjust these you press the plus symbol to go up and the minus symbol to go down. And they move in increments of two to three pounds. So that's all very simple. Now, to adjust the tamping settings and this goes into play...puts into play the different levels of pressure you can use. To do this you hold down this settings button for approximately five seconds. You'll see the tamper come down, you'll see it move back up, and then you will see a P and a number appear on the display screen. So it starts out at P0 which is the speedy set...speedy setting. This is a really quick double tamp that takes about 1.5 seconds and it has a grind, or it has a pressure range of 22 to 66 pounds. P1 is the precise setting and it is also a double tamp but it spends...takes longer to...for the tamp to retract and it also has a 22 to 66 pounds of pressure. P2 is the soft tamp. And this also is a double tamp with a slower retraction of the tamper from the tamper base. But it also has a lower pressure setting. This is the only setting that you can use only 11 pounds of pressure. So in P2 11 to 33 pounds is your range. P3 is the Hulk. And this is a triple tamp. So it's just bang, bang, bang, and it's 22 to 66 pounds. And lastly, you have just a plain single tamp. And again, 22 to 66 pounds is your range for that. So once you've chosen that, we'll go home, you press the setting button, and you're back to adjusting your pressure range. This lower clamp can also be adjusted to fit whatever portafilter you're using. To do this, you use the T wrench that came with the PUQ Press and you just loosen these bolts. And then there's this little knob, a little wheel more or less, that you can spin back and forth and this either moves it up or down. This is convenient as well as these little dashes on the back, because it allows you to move very small amounts, and then when you find the right place, you can make sure it's leveled and you can return to the spot if you're using multiple portafilters. And once you've picked the right...the right spot, you just tighten it back and you're good to go.
Caring for the PUQ Press is important to maintain its longevity and PUQ Press does recommend several ways to do this. First, you want to make sure that you clean the tamper base daily as well as the sensor. Clean the tamper base with a dry cloth and the sensor with a brush. Weekly, they recommend that you clean the entire piston. To do that, you press the settings button, hold it down and it will lower. You're able to take a dry cloth and wipe off all the residue that's built up. Press the setting button again and it will retract back upwards. They also recommend that you keep the upper-level cavity cleaned weekly with a dry cloth. If you lean the grinder back at a 90-degree angle, you'll see a bolt. If you use the Allen key that came with the PUQ Press to loosen the bolt, remove it, you'll be able to remove the tamper by twisting it counterclockwise. Then just get a dry cloth and clean out all the residue built up over there. And then it's done. And with basic maintenance, you will see this lasting you for a very long time. A few notes and warnings about the PUQ Press. Make sure that it's never resting on vibrating surfaces. Refrain from sticking your hand between the tamper and the lower clamp because you run the risk of getting your finger smashed. And make sure that it's completely unplugged before doing any maintenance on it. So that's it for the PUQ Press M3. It comes with tons of options and settings to play with, experiment with, so you can find out what works perfectly for your cafe. And then, you can produce consistently flat, level tamps over and over again, regardless of the barista or the skill set. And most importantly, you don't have to worry about restraint anymore. You can check out the M3 online at primacoffee.com and thanks for watching.


