
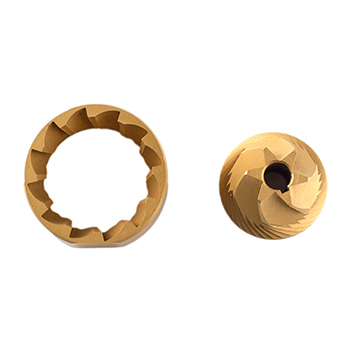
Video Overview | Option-O Tin Coated Burrs for REMI
The conventional burrs, which come standard with the REMI, were engineered to grind best for brewing methods, not for espresso. The contemporary burrs, on the other hand, which are coated in a layer of titanium nitride for durability and hardness, were engineered to grind best for espresso. In this video, Steve goes over the advantages of the new burrs and shows us how to install them.
Transcript
Increases the REMI’s grinding range
Featured Product
Hi, I'm Steve with Prima Coffee, and today we're going to talk about the Contemporary Burrs for the REMI Manual Grinder from Option-O. The REMI Manual Grinder comes standard with 38-millimeter conical steel burrs that were engineered with a geometry specific for brewing coffee. So, that is your pour-over and your immersion, but not for espresso. If you watch the video we made about the REMI, you'll know that there is a feeding problem when you're trying to grind really fine with those standard burrs. It takes a really long time to get coffee through on those finer ranges. That is why Option-O has now released these Contemporary Burrs. These are engineered specifically for brewing espresso or Turkish coffee. They're still 38-millimeter conical steel burrs and they're stainless steel, but they are coated with a layer of titanium nitride, and that increases the lifespan of these burrs by about five fold, which really means they're going to last forever. And also, increases surface friction so that you can feed more efficiently coffee through these burrs and into the grinds catch at those finer ranges. So for context, it took us only about 2 minutes to grind an 18-gram espresso with the Contemporary Burrs here, whereas it was taking about 10 minutes with the standard conventional burrs that the REMI comes with. But again, that was never the point of those burrs. These are made for espresso and those were made for brewing coffee. So now, let me just show you how to install these burrs. It sounds simple and it is simple, but it is important that you pay attention to the alignment step within this procedure so that these burrs do grind as they should. If they aren't properly aligned, they may not feed properly and they may have the same problem as they had before, and you also won't see the same kind of grind uniformity that you should be getting with these burrs. All you're going to need for the installation is a 2.5-millimeter hex wrench. You can use these as a flat or you can use a ball as well, a brush, so once you get into that burr and behind that burr, you can brush away any coffee that's collected there.
First step is to remove that center burr, and to do that, what you're going to do is hold the handle in place here and turn the wheel counter-clockwise until the center burr comes free. So, this may take awhile. Just be a little patient with it before you can feel it come free. Okay. So, you're going to use this so put it somewhere where you can come back to it, and then that center burr just comes right now, and you put it there. So now, what we want to do is remove this magnetic ring, and this ring holds that outer burr in place. So, this is where you're going to need to use the hex wrench. Break these. And then, you can start to take them out very quickly. Keep these because you're going to put those back in. So now, this magnetic ring, it can just come free. You can just put your hand in and you can pull that out. That right there is the outer burr, and so you can just pull it out, but there is a little key in here. It's a wedge key that keeps that outer burr in its position, so you do want to make sure that you do not lose that. So, dump it over, both the outer burr and this key will fall out. So, put that aside. We're going to use that with the other burrs as well.
Okay. So now, I would take that brush and clean out any coffee that got in there, so that when you install these burrs, they have a perfect place to fit. So, the first step is the last step on the other one. And that is just to take the outer burr with the teeth up and put it in its place. You can see there's a flat spot here, and that flat spots corresponds with where the key goes. So, you will want to go ahead and put it right there like so. And then, take your key and put it in there to keep that burr in its position. Now, it's important that that key can go in top or bottom but not side to side. So, you do want to make sure you get it in there. It is a little hard to get in there. Great. And that means that the outer burr is in its position. The magnetic ring, like I said, is what holds that down and where it should be. And this is the alignment step. So, logic dictates that you just put this in and you tighten these screws and you're good to go. But, in order for this to be properly aligned, what you're going to do is you're going to put these screws in but you're not going to tighten them down all the way. You're going to leave a little bit of room so that you can still hear it wiggling in there. So, go ahead and put these in but keep them a little bit loose. So, that's still pretty good there. This is the centering step. This is how you align these burrs. So, you'll take this center burr here, which is on the axle, so it'll always be centered, and you get it in its place. You can see there's a little notch there and that corresponds with the key on the axle. So, this will fit, you can turn it until you find the spot and it goes down and on. You will go ahead and put this wheel into place and turn it all the way down to zero. Okay. So at zero, the burrs are touching. You can see there's really no gap between the two and the handle is stuck in its place, so the burrs are met. This is the zero point and that center burr going all the way in there has pushed that outer burr into its center position. So now, you are ready to go ahead and tighten down these screws here. Great. So now, the burrs are aligned. You just need to start backing off from zero where you will start being able to grind it. So, those are the Contemporary Burrs from Option-O and how to install them in the REMI Manual Grinder. And now, you're ready to start making great espresso. And if ever you want to go back and make that great pour-over and immersion, you now know how to switch out the burrs and it doesn't take very long.


