Video Overview | Cafelat Robot Espresso Maker
Cafelat's stylish home espresso maker is here! This novel manual espresso machine is fairly simple to use, and with a little practice you'll be pulling shots that rival your favorite shops in no time at all.
Transcript
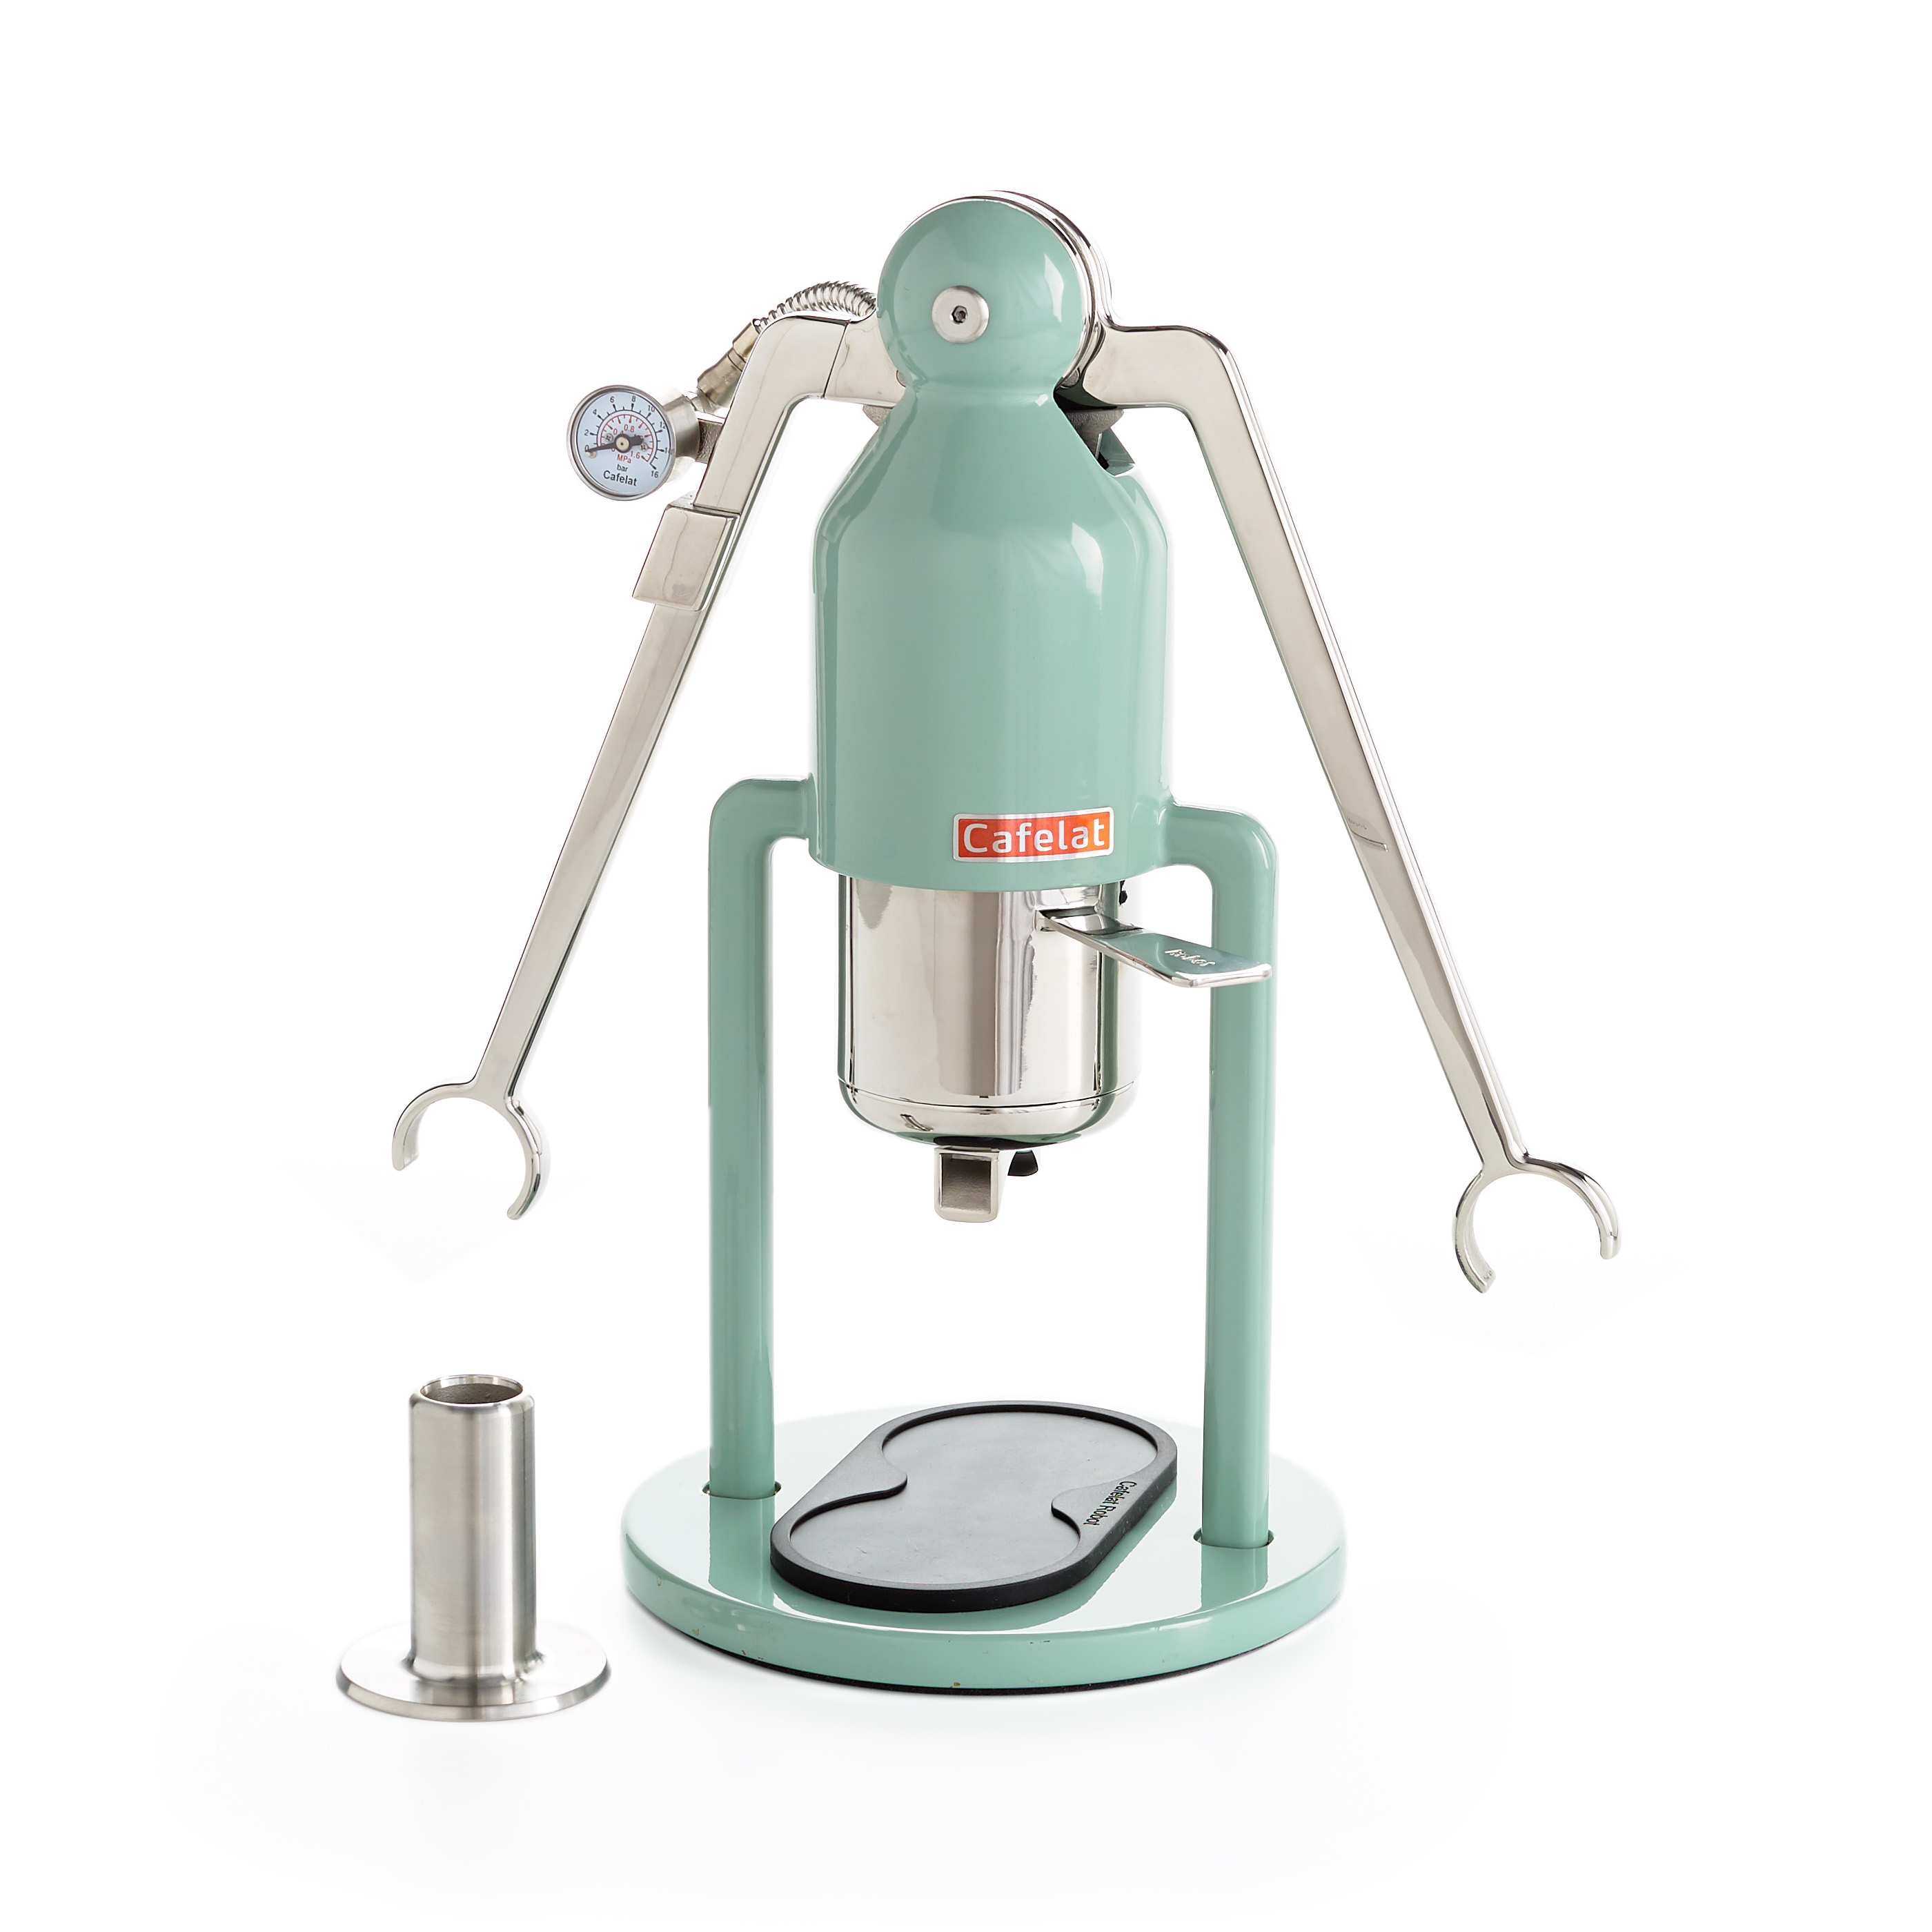
Hey, folks. It's Steve with Prima Coffee here. Today we're going to take a look at the Cafelat Robot manual espresso maker. This is a pretty unique way to make espresso. It's got a very novel configuration with the basket and piston, and it is truly a really nice and well-made manual espresso maker. It's like every bit as quality as some of your higher-end home machines might be. Of course, as a manual espresso maker, it is non-electric and you need to provide a source of hot water. You also need to, obviously, you know, have a grinder. You can't steam milk with it, unfortunately. But if you're an espresso enthusiast, this is a really excellent home machine for you. It's not super travel friendly just because of the size and the weight, but if you are the type of person that wants to make your own Pelican padded foam case for it, you certainly could. Overall, really excellent home machine, and I'm going to dive right in and show you how to make espresso with this.
Cafelat Robot Manual Lever Espresso Maker
Capable of true 9 bar shots
Featured Product
So we have this all-metal body here, we have a steel portafilter. I'm actually going to raise the arms up here to remove this portafilter and basket. Again, it has this novel system where you'll see right now the piston actually extrudes kind of beyond the body, and the portafilter itself is quite deep. You actually have this very deep custom basket made for it. It's a 57.5-millimeter diameter basket, but it holds, overall, it holds about 150 milliliters of water, and part of that, of course, is also taken up by coffee. So, the way that you load this is pretty interesting. Inside, you have this little steel dispersion screen. Of course, you have this very deep basket, and you'll put your coffee in, you will tamp it, put the screen on top, and then put your water on top of the screen. You also have some optional paper filters that come with the device, you can actually put that on top of your puck. That actually leads to some interesting things with shot-pulling that I'll get into a little bit later. But overall, the method of loading this is pretty simple and straightforward if a bit unique.
So once you have your water in there, you can load it into your portafilter. And the portafilter actually has these removable spouts. So these just pull right off, there's a silicone O-ring seal. I'm actually going to leave these off while I pull my shot. And you can place this wherever you like so if you need to twist it to align with the cups that you have, you can do that, or for me, I'm just going to actually pull it bottomless. Once I have all my coffee and water in here, I'm going to load it up, and to do that, I want to raise the arms. That's just to pull the piston up top, makes it easier to load in. I have two little lugs, front, and back. I want them to be more or less straight out,12 and 6 o'clock, relative to the Robot, and then I can just lock in either left or right, actually, it doesn't matter. Once I'm locked in, I can lower the piston, and then if I have water in there, I can start my extraction. So again, it's a bit of a different way to pull espresso. Most espresso makers are not having you load both coffee and water into the basket like this. But overall, the fundamentals, you know, physics of actually extracting are the same.
Cafelat Robot Barista Manual Lever Espresso Maker
Basket holds up to 25 grams of ground coffee comfortably
Featured Product
Once you start pushing the piston down, you are applying pressure on top of that water and you can extract up to nine-bar shots or even more depending on how finely you've ground your coffee. Actually, for me, I prefer to pull a little bit less, more like seven to eight bars of pressure, but that is mostly a personal preference thing. On the barista model, you'll see here I have that pressure gauge, the standard model does not have that. You can get a feel for the proper pressure to pull shots, and really there's a lot of wiggle room there. Once you get a feel for how much pressure might be involved, you don't necessarily need a visual feedback mechanism, you can have that sort of tactile feedback of how much the arms are sort of resisting your force. It takes a little bit of a feel, takes a bit of getting used to, but you can still dial in coffees and pull excellent shots even without that pressure gauge. So depending on, you know, how much of an actual metric you want to have, the gauge isn't really necessary. It is perhaps nice to have in terms of consistency and understanding how your shots are extracting.
So I'm going to go ahead and load this up and pull a shot for you. One of the things that you'll notice, of course, is we have these two legs that make it a little bit tough to put most espresso scales underneath. An Acaia Lunar will fit, but you have to put it at an angle, which is okay if you're pulling just into one cup or one demitasse. If you have two cups, unfortunately, it's not going to fit. The Pyxis, the newest Acaia scale, the smallest one, should fit in between the two legs but they may not be able to hold both...two demitasses or two cups underneath, unfortunately. So you might have a little bit of trouble finding the right scale if you prefer to use one. For me, the Lunar is going to work just fine. So, the first thing I'm going to do is just pull out my basket. And I'm going to measure... I've ground 18 grams of coffee. It's ground a little bit finer than I might grind for a home machine that's pulling just nine bars or even with a little bit of pre-infusion, and that's because lever machines can take a little bit of a finer grind just because of the way that they handle pressure.
As you're pushing down, you have a slower ramp-up in pressure, and, of course, you can manually adjust on the fly how much pressure you're applying. So, you can have shots that run 60 seconds and taste great because you've pulled them at a lower pressure and ramped up a little bit more slowly. So I'm going to add my 18 grams of coffee here. The basket will hold about 25 grams as a max, in our experience. It's a little tight if you get up that much, but you can make it happen and really the limit is how much water you can add appropriate to the amount of coffee that you're using. Again, it holds about 150 milliliters total, and that includes, you know, the space taken up by the coffee, the distribution screen, and the paper filter if you choose to use it. Now, they include this handy tamper as a slightly off size of basket at 57.5 millimeters. You might have a hard time finding a compatible tamper. A 57-millimeter tamper will do the job if you prefer to have one. Of course, the handle on this is a little bit small. I actually prefer to thumb tamp, and checking that your level is not as necessary as it is in some other baskets, we think that that's partly just because you have that nice big water cushion on top and the extraction is handled a little bit differently anyway. But overall, just still try to compress firmly as level as possible.
I'm going to take my distribution screen and place that on top. And then I have some hot water ready here. For an 18-gram dose, if I'm pulling about 1 to 2, I'm going to add 60 grams of water here. The coffee is going to absorb some water, and I also need to make sure that I have about 36 to 40 grams total for my yield. So that also takes a little bit of getting used to in terms of practice and understanding how much water it takes to pull the shot to the yield that you prefer. But you can, you know, obviously, kind of go back and forth. You could add too much water and just stop the shot, you know, and pull your cup when you are ready. So, finding the right amount of water to use isn't totally necessary. I'm going to add my cup here and tare that out, and then I'm going to add my portafilter. So again, just to lock on, I want my lugs at 6 and 12 o'clock, and I'm going to lock it in to the right. Add my cup And then I'm going to start a timer because I'm just immediately going to apply a little bit of pressure. And you'll see on my gauge, you know, my pressure is going to start to build.
I don't totally have a feel for what nine bars feels like, so with the gauge facing away from me, I'm going to have a little bit of a tough time probably nailing the perfect pressure, but you will feel a pretty good bit of resistance. Nine bars is actually kind of strenuous to maintain. It helps to stand directly over the Robot and, you know, so you can apply more of your sort of posture into the arms. But anywhere between six and eight really is fine for an extraction. And lever shots, as I said, they can take a little bit longer. They can go, you know, even up to a minute or more and still be good extractions. So I'm going to stop this right at 40. I'll have some drips that fall into my little silicone pad here. And I'm going to taste this. That shot ran, looks like, around 50 seconds. It's lovely. It's got great body. It's got good sweetness to it. I took a moment to dial in just a couple of shots before we started shooting, and overall, I think what we love about the Robot is that as a lever machine, it actually is somewhat forgiving in terms of how you apply pressure and pull shots. You can get some pretty good, if not perfect, you know...rather, not quite perfect, but pretty good extractions, without too much, you know, fiddling and guesswork.
As long as you're getting an appropriate ratio for the coffees that you're using and, you know, you're pulling coffees that you like to shot profiles that you tend to enjoy. So if you prefer a stronger shot, you know, and you're pulling 1 to 1 in terms of ratio, you don't really have to worry so much about perfect pressure or perfect time because just the way that lever machines kind of pad out how picky some coffees can be. I could probably dial in the shot a little bit more and play with my pressure a little bit more and get some better flavor profile to it. Right now, I actually quite like this. It's good body, good sweetness, the flavors aren't perhaps quite as clear as I would like them, and that was probably what I would dial in for, is getting a little bit more of the berry that's in this coffee, pulling that out a little bit more. And I can do that because I can manually control my pressure on the fly. I can watch the time on my scale, I can watch the pressure on my gauge, I can change how I pull these shots and get really good results. So that is the Cafelat Robot. Thanks for watching.